Have a Magical Birthday | Whimsy Stamps

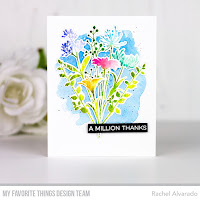
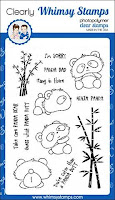
Hello everyone!  I have a bright and colorful card to share with you today featuring the new Create Magic Clear Stamps Set!  This set was so much fun to play with and makes for some truly amazing designs! (Affiliate links used.)


I wanted to try and create a magical scene with my wizard today and used some Distress Ink Blending for my background in order to accomplish this.
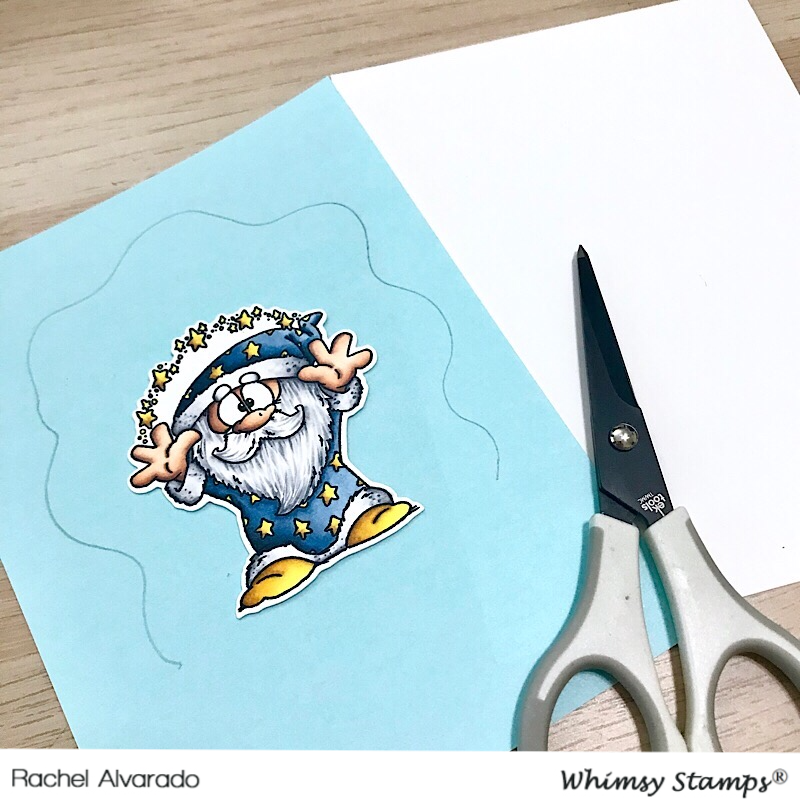

To start, I placed my image (for reference) onto a piece of masking paper.  I then loosely drew the outline of the background that I wanted onto the masking sheet.  Ideally, you should draw your background onto the white side of the masking sheet, but since my background was pretty symmetrical, I drew it on the blue side just to get a better picture to show you.


I cut out around my outline, making a window where I would blend my ink and then attached the masking sheet to my card base.  I also used some tape and cardstock to mask the bottom portion of my card.


To get a bold background with Distress Inks can take some time and multiple layers.  I slowly worked from the inside out, laying the lighter color to the darkest and blending as I went along.  I used Twisted Citron, Stormy Sky, Faded Jeans, Chipped Sapphire, and Black Soot Distress Inks.


Once blended, I then splattered this image with some water.  I let the water sit for a minute and then lightly blotted it dry with a paper towel.  Lastly, to finish off the background, I then splattered it with some Opaque White Paint.  I used some Warm Gray Copics (W00, W0, W1, W2, W4) to color the ground area and added some ground shadows where I would be placing my wizard.


I stamped my wizard with Memento Tuxedo Black Ink onto a sheet of Neenah Solar White 110lb Card Stock and colored him with Copics.


Blues: B91, B95, B97, B99
Skin: E0000, E000, E21, E11, E04
Yellow: Y02, Y08, Y13, Y15, E34
Whites/Beard: 0, C00, C1, C2, C4

Thanks so much for dropping by!  You can check out this set and all of the Whimsy Stamps April Release HERE.


Create Magic


Also, come play along with the Whimsy Stamps April Showers Bring May Flowers Challenge for a chance to win a Whimsy Stamps Gift Voucher!  Click HERE for more details.

If you liked this card and want some more crafty inspiration, don't forget to check out my INSTAGRAM feed!

Hugs!

♥ Rachel


Flower Silhouettes | MFT Stamps

Hello, crafty friends!  With Mother's Day right around the corner here in the US, the Flower Silhouettes Set from My Favorite Things can be a perfect choice for your Mother's Day cards!


I love how this kit can be used to create all types of floral cards.  I used a watercolor stamping technique today, similar to that of a card that I had presented last week.  If you had missed that post, it's basically inking up an image and then spritzing it lightly with water each time before you stamp.


This time, I combined my images with the Flower Vase Die-namics to create a beautiful flower bouquet.  I love how this fits beautifully on a slimline card (measuring at 8.5" tall x 3.5" wide).  I used a piece of Primitive Cream Card Stock for my base and splattered it lightly with some brown watercolor paint.


Once dry, I then stamped my sentiment with some Milk Chocolate Ink a couple of times with my Misti Stamping Tool.  I then added a strip of both Milk Chocolate and Kraft Card Stock at the bottom for some added interest.


I diecut the vase from some Ranger Watercolor Paper and then used some teal green watercolors to paint it.  I used a couple of layers to give the color some depth and let some water dry in various lines across the image to look like cracks in the vase.


I also used Ranger Watercolor Paper to stamp my images and cut each flower piece out with it's coordinating die.  I used Distress Inks to stamp my images but most slow drying inks should work wonderfully with this technique.

Distress Inks Colors Used For Flowers:

Greens: Twisted Citron, Mowed Lawn, and Peeled Paint
Yellow: Squeezed Lemonade, Scattered Straw, and Fossilized Amber
Purple: Shaded Lilac and Blueprint Sketch
Pink: Spun Sugar and Worn Lipstick
Mint Green: Cracked Pistachio and Evergreen Bough
Blue: Tumbled Glass and Salty Ocean


There are still a few kits available for purchase at a bundle discount.  Otherwise, you can purchase each set separately and work on collecting this set at your own pace.

Flower Silhouettes Day 2Flower Silhouettes Day 1Flower Silhouettes Release Day

In case you missed my previous posts showcasing this set, you can click on any of the above images to check out the card details.


As always, thank you for taking the time to stop by!  If you liked this card and want some more crafty inspiration, don't forget to check out my INSTAGRAM feed!

♥ Rachel

Surprise Party Paper Pack | Sunny Studio Stamps

Hello everyone!  I am sharing a card with you today that features the new Surprise Party Paper Pack from Sunny Studio Stamps.  I just adore all of the gorgeous paper pads they have to offer!  If you're familiar with my style, you know that I love to use lots of bold and vivid colors.


The Surprise Party Paper Pad is filled with colorful and gorgeous sheets of patterned paper.  I used two different sheets of patterned paper in my card today.  I also combined this paper pad with the new Silly Sloths Stamp Set and coordinating dies.


To start, I first stamped all of my images with Memento Tuxedo Black Ink onto a sheet of Neenah Solar White 110lb Card Stock.  I then used Copics to color everything.

Copic Colors Used:

Greens: YG0000, YG01, YG06, YG17, YG67
Sloth Body: E30, E31, E33, E39, E29
Sloth Face and Belly: E50, E51, E53, E55
Red Party Hat: R14, R26, R59


I then diecut a circle out of my center yellow patterned piece of paper and placed behind it a bold blue sky made with Distress Oxide Inks (Tumbled Glass and Salty Ocean).  I splattered this ink blended piece with some Opaque White Paint and Black Watercolor Paint for some added interest.  I added my scalloped frame using the Fancy Frame Circle Dies with White Card Stock.


I then stamped my sentiment with Black Ink (and heat embossed the word "slothsome") prior to piecing my card together.  Lastly, I used 3D Foam Adhesive Squares to add my images, giving them some dimension.

Thanks so much for dropping by today!  If you liked this card and want some more crafty inspiration, don't forget to check out my INSTAGRAM feed!

Hugs!

♥ Rachel

Whimsy Stamps | Hang in There

Hello everyone!  I have a fun little card to share with you today featuring the Panda Butt Clear Stamps Set from Whimsy Stamps. (Affiliate Links used.)


This set is filled with a bunch of cute little pandas and lots of fun sentiments.  To start, I first created a bright green background by blending some Twisted Citron and Mowed Lawn Distress Oxide Inks onto a sheet of Neenah Solar White 110lb Card Stock.  I then splattered this piece with some water and lightly blotted it dry with a a paper towel.  Once dry, I also lightly splattered some Opaque White Paint over the image as well for added interest.


I used the Notched Rectangles Die Set to create a double border around my ink blended background.  I first diecut one panel in white and the other from Kraft Card Stock.  I then stamped my sentiment onto the bottom portion of the Kraft panel and then used foam tape to adhere the two together to give some added dimension.


Before adding this piece onto my ink blended panel, I heat embossed some white bamboo pieces in various places around the edges.  Lastly, I added my images with both liquid adhesive (for the tall bamboo piece) and foam squares (for the panda).  I had stamped the panda with Memento Tuxedo Black Ink and used some cool Copic colors to quickly color the panda bear (0, C00, C1, C2, C4, C5, C7, C8, C10).

Whimsy Stamps

You can check out more of the Whimsy Stamps April release HERE!  I love how diverse their selection is.


Thanks for dropping by!  If you liked this card and want some more crafty inspiration, don't forget to check out my INSTAGRAM feed!

♥ Rachel


Panda Butt Die Sethttps://whimsystamps.com/collections/border-dies/products/notched-rectangles-die-set?aff=53Panda Butt


MFT Stamps | Wednesday Sketch Challenge #434

Hello!  It's time for a new Wednesday Sketch Challenge from My Favorite Things!  I really think that you're going to enjoy playing with this one!


I love the circular pattern on this sketch and used some Distress Oxide Ink blending along with the cute gnomes from the 'BB You Gnome Me' Stamp Set.


I used both sets of the Circle STAX Die-namics to diecut my circles into my white background panel.  I then added some ink blended panels behind each circle.  I used Tumbled Glass, Salty Ocean, Squeezed Lemonade, Fossilized Amber, Twisted Citron, and Mowed Lawn Distress Oxide Inks.  I also stamped a few pieces of green foliage from the new Flower Silhouettes Stamp Set.


For my images, I stamped them onto a sheet of Neenah Solar White 110lb Card Stock and colored them with Copics.  I used the coordinating dies to cut them out.  For my sentiment, I heat embossed it with White Detail Embossing Powder onto a strip of Black Licorice Card Stock.


Here's a look at today's sketch.  Come play along for a chance to win a $50 MFT Gift Voucher!  Make sure to stop by the MFT Blog for more challenge inspiration!


Thank you for taking the time to stop by!  If you liked this card and want some more crafty inspiration, don't forget to check out my INSTAGRAM feed!

♥ Rachel

Flower Silhouettes Card Kit Release | MFT Stamps

Hello, crafty friends!  The Flower Silhouettes Card Kit from My Favorite Things is now available!  If you've been scrolling through all of the amazing designs by the rest of the MFT Design Team, you probably have seen just how versatile this kit really is!


For my card today, I did some ink blending with Distress Oxides (Spun Sugar, Picked Raspberry, Dusty Concord, and Wilted Violet) on a sheet of Neenah Solar White 110lb Card Stock.  


Once done blending, I splattered this piece with some water and then lightly blotted it dry with a paper towel after letting it sit for a minute.  I also splattered this piece with some Opaque White Paint and some black watercolor paint.  Once dry, I diecut this panel with one of the A2 Stitched Rectangle Die-namics.


For the flower silhouettes, I first stamped them with Clear VersaMark Ink and then heat embossed them with Black Embossing Powder.  I also heat embossed my sentiment onto a strip of Black Licorice Card Stock.  I used this same card stock to add a subtle black panel behind my ink-blended piece.  Lastly, I adhered all of this to a white A2 top-folding card base.


This kit can be purchased as a bundle deal while supplies last or separately, depending on your preference.  Make sure to stop by the MFT Blog and check out each of the DT Member's post for today!  Leave a comment on each member's Card Kit Release Day Post for a chance to win an MFT Gift Voucher!


Thank you for taking the time to stop by!  If you liked this card and want some more crafty inspiration, don't forget to check out my INSTAGRAM feed!

♥ Rachel

Flower Silhouettes Card Kit Day 2 | MFT Stamps

Hello everyone!  I'm back today to share another card using the Flower Silhouettes Card Kit from MFT Stamps.  Today, I used a different technique that some call watercolor stamping.


To do this, I inked up my stamps with Distress Ink and then spritzed the stamp lightly with water prior to stamping it onto my paper.


I used my Misti to make this simpler because I liked to add a few different colors (for some messy shading) to each stamp and would stamp each image a couple of times (spraying it lightly with water each time as I went).


I used Ranger White Watercolor Paper for my card today and used the coordinating dies to cut the flowers out.


Distress Inks Colors Used For Flowers:

Greens: Twisted Citron, Mowed Lawn, and Peeled Paint
Yellow: Squeezed Lemonade, Scattered Straw, and Fossilized Amber
Purple: Shaded Lilac and Blueprint Sketch
Pink: Spun Sugar and Worn Lipstick
Mint Green: Cracked Pistachio and Evergreen Bough
Blue: Tumbled Glass and Salty Ocean


This beautiful kit will be available tomorrow, April 23 at 10AM EDT.  Don't forget to stop by the MFT Blog to see some more inspiration and leave a comment there for a chance to win a $25 MFT Gift Voucher.


Thank you for taking the time to stop by!  If you liked this card and want some more crafty inspiration, don't forget to check out my INSTAGRAM feed!

♥ Rachel