 |
| Shark Pudgie Stamps & Die Set |
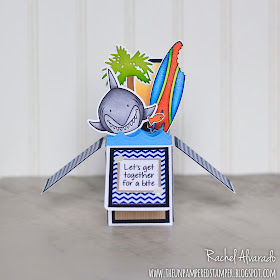
My first example is a cute little box card that features a couple of stamp sets. I first stamped and colored all of my images with Copic Sketch Markers. The colors that I used can be found below. I used the Box Card Die Set for my base and trimmed some SOL Midnight Cardstock & patterned paper from the "Celebrate" and "Forever" Collections for my panels.
In order to create a bite out of my surfboard, I used one of the dies that comes in the SOL Watermelon Die Set that was released earlier last year. The surfboard and the cute little fish both came from the Summer4fun Stamp Set. I added some waves using a wave border die from the Whale Die Set and also a palm tree from the Flamingo Die Set. For the palm tree, I added some Kiwi and Green Apple Inks around the palm fronds and some Gingersnap & Chocolate Ink around the base.
Box Card Copic Colors: Shark (C00, C0, C1, C3, C5, C7) Surfboard (Blues: B21, B24, B26; Greens: YG01, YG06, YG09; Oranges: YR04, YR07, YR18)
For my next example, I created a fun shaker card. Once again, I stamped and colored the shark with Copic Sketch Markers (N1, N2, N3, N5).
In order to create my background, I first diecut a circle that was slightly larger than the circle of my "window". I then blended together TSOL Sky, Blueberry & Licorice Inks on some Neenah Classic Crest 80lb Smoth Solar White Cardstock. Once complete, I spritzed this blend with a little bit of water and then dabbed it with a dry paper towel.
If you look at the sentiments that are included with this set, the words are stacked upon one another. I wanted my sentiment to stretch across the base of my card, so I hand cut three pieces of paper that matched the length of my words exactly and lined them up where I would be stamping my sentiment. This helped me to be able to center my sentiment as best as possible. I used a ruler to draw a faint line across where I should stamp. Once ready, I then masked the words that I did not want to stamp and repeated this process until my sentiment was complete. ** (Make sure you remove the tape each time before stamping or you will have a big mess on your project!) **
Lastly, I added some foam tape around my rectangle and circular shaker opening. I then used some powder to remove any stickiness from the side of the tape before I placed my shaker embellishments into my card. For the top portion of my card, I glued a piece of acetate behind my circular window. Once done, you have a fun & easy shaker card!
And now for the FLASH SALE!
 | ||||||||
| minidoublebanner2stamp |
Here is an example of a sweet & festive birthday box card that I made using this set.
I will be playing along and entering one or both cards into the following challenges:
 |
| Simon Says Monday Challenge: Masculine |
 |
| Simon Says Wednesday Challenge: Make it Masculine |
Thank you all for stopping by my blog today! Hoping you found some inspiration! For more ideas, please visit The Stamps of Life Gallery.
Feel free to leave any comments or questions! Happy Stamping!
Rachel


No comments :
Post a Comment